Pages

Tuesday, 15 May 2012

It's Chocolate Chip Day!

I’m so glad that I visit with my on line friends every day.  If I didn’t, I’d never have known that today is Chocolate Chip Day in the US!

I love me some chocolate chips and I know that you do too.  Here are three recipes from earlier blogs to help you celebrate.  Enjoy!


Friday, 27 April 2012

Why I Broke Up With Kale


I used to like kale.  I bought it when I could afford it and, some years, grew it in my garden.  Last year, though, I grew to dislike it intensely. 
Last year, my husband and I bought a CSA (Community Supported Agriculture) share in a farm here in the valley.  Because I was hoping to build a catering business, I purchased a large family share, reasoning that I could incorporate the beautiful fresh produce from the farm into my menus. 
A friend of mine recently pointed out that if you want to make God laugh, you make plans. It certainly seemed that way at our house last spring.  I got sick and found myself unable to work.  I had to give up any hope of catering and was unable to work at anything other than my blogs for the next ten months. 
For the months of our CSA subscription, this change in circumstance meant that we had a weekly supply of produce which far exceeded our needs.  We dealt with the excess produce from our CSA by sharing it with friends and family members and by donating some of the excess to the food bank. 
Unfortunately our farmers were big kale enthusiasts and we ended up with huge amounts of kale every week.  No one in our circle wanted kale and I do mean no one.  Try as we might to find a home for it, we just couldn't give it away.
I strongly dislike wasting food so we ended up eating kale with at least one meal, every single day, for months.  I tried hard to vary the ways that I served it but both my husband and I got to a point where we just couldn’t stand to eat another bite or see another leaf of kale. We decided we couldn’t bring it home any more. 
We’d offer our share of kale to other CSA shareholders who were picking up their vegetables at the same time we were, but many of them were tired of kale too.  It was often refused.  If we couldn’t give it away, we just left it at the farm.   I still regret the money wasted on produce not consumed but, even now, I can’t greet kale with any enthusiasm.
It’s a shame, really, that kale has worn out its welcome at our house because it’s very nutritious.  World’s Healthiest Foods rates kale an excellent source of vitamins K, A, and C, and of manganese.  It’s a very good source of fiber, copper, tryptophan, calcium, vitamin B6, and potassium and it’s rated a good source of iron, magnesium, vitamin E, omega3 fats, vitamin B2, protein, vitamin B1, folate, phosphorous, and vitamin B3.[i] 
Kale is shown to help reduce cholesterol and to lower the risk of five different cancers.  Kale’s glucosolinates support the body’s detoxification system, and its flavinoids provide antioxidant and anti-inflammatory benefits.[ii]
Curly kale has been with us for a long time.  It’s a descendent of the wild cabbage plant and is believed to have originated in Asia minor.  It was brought to Europe around 600 BC by Celtic wanderers and, because it grows well in cooler climates, has been a significant part of European cuisines ever since. 
Kale was an important food crop in ancient Rome and was widely cultivated by peasants and farmers during the middle ages.  The English brought it to North America in the 17th century.
Here on the island, our mild winters mean that kale can be successfully over-wintered, providing greens from the garden during winter months when little else is available.  This, of course, explains its attraction for our CSA farmers.  It also explains why, when I went out to visit our new allotment garden last week, I found that the previous garden plot holder had left behind a crop of kale. 
The question now is if my frugal nature and good nutritional sense can overcome my previous overexposure to this healthy vegetable.
Do you have any favourite kale recipes?  If so, please share them with me.  I’m seeking inspiration.


[i] http://whfoods.org/genpage.php?dbid=38&tname=foodspice#nutritionalprofile
[ii] http://whfoods.org/genpage.php?dbid=38&tname=foodspice#nutritionalprofile
[iii] Both ornamental and dinosaur kale are much more recent varieties. Dinosaur kale was discovered in Italy in the late 19th century. Ornamental kale, originally a decorative garden plant, was first cultivated commercially as in the 1980s in California.

Friday, 13 April 2012

No More Fitted Sheets For Me


Have you ever wondered why most hotels don’t use fitted sheets?  It’s all about the bottom line…and the bottom sheet. 

A sleeper’s body makes more sustained contact with the bottom sheet on a bed than it does with the top sheet.  The top sheet rests more lightly against the sleeper and is, therefore, subject to less friction.  When you use the same sheet for the bottom sheet each time a bed is made, the bottom sheet wears out more quickly than the top sheet.  It’s why, when you go to the thrift shop, you see flat sheets but you rarely see fitted sheets.  The fitted sheets have worn out.

Fitted sheets also need to be folded in a different manner from flat sheets.  In hotels, where time and space are both equivalent to money, allotting extra time to fold fitted sheets and extra shelf space for their storage does not make good fiscal sense.  Using flat sheets not only saves on laundry time and storage space but also ensures that the sheets’ usage is more likely to be rotated between top sheet and bottom as the beds are made.

I used to buy fitted sheets because I bought sheet sets; convenient packages containing a flat sheet, a fitted sheet, and matching pillowcases.  There are lots of lovely sheet sets out there and I enjoyed all the different patterns and colours. 

I don’t buy those sheet sets any more.  This year we made a pledge to buy all of our clothing (except undergarments) second hand, and to buy as many of our household goods as possible that way too.  That means we’re buying those flat sheets you see at the thrift stores. 

In truth, now that I’m back in the habit of using them, I’m coming to prefer flat sheets over fitted.  Fitted sheets always seem to have pockets that are either too shallow or too deep for our mattresses and some are ever-so slightly too short for our mattress.  If you've ever tried to stretch a barely-fitting fitted sheet over a mattress when you're in a hurry on a work day, you'll now how frustrating that can be!  Flat sheets may seem like more work but they can actually speed up the process of making a bed because they're more easily adjusted to the particular size and shape of our mattresses.  They certainly save me time when folding laundry:  No fussing around with those elasticized corners.

Prior to the introduction of fitted sheets, frugal housewives were in the practice of extending the lives of their flat sheets by “turning” them.  They would cut worn sheets down the center, turn the worn edges to the outside, and sew the less worn edges together at the center.  

Modern Princess-and-the-Pea sensibilities make most of us reluctant to sleep on a sheet with a center seam these days but frugal practice is not just about saving money; it’s about reducing waste too.  If we are not going to turn our worn sheets, we can (and should) repurpose them in a myriad of other ways.  Worn sheets can be made into aprons, pillowcases, children’s clothing, curtain linings, quilt pieces, gift bags, lingerie bags, produce bags, and jelly cloths.  They can be used as a foundation for needlework.  They can be made into cleaning rags or cut into strips that can be crocheted into pot holders, hot pads, or rag rugs. 

I’ll be working on some projects made with sheets in the coming weeks and, hopefully, sharing them in my here.  In the meantime, if you go shopping for sheets, consider buying flat instead of fitted.  You’ll be surprised, over time, at the money it saves you.
___________________________________
This post is linked to Gallery of Favorites hosted by Premeditated Leftovers and The 21st Century Housewife, and to The Weekend Wrap Up Party hosted by Tatertots and Jello, to the Pity Party at 30 Days, to Sunday Roundup with Kayla, Rose and Heather, and to Link it up Wednesday hosted by {Junk in the Trunk}, to Making Mondays Marvelous with C.R.A.F.T., and to Tip Me Tuesday hosted by Tip Junkie.

Gallery of Favorites    


{Junk in their Trunk}   DIY projects and crafts   Tip Junkie handmade projects

Thursday, 29 March 2012

Fresh Horseradish


What with learning more about Passover traditions and trying to change up our family dinner menus, horseradish has been on my mind lately.  It’s a great relish all on its own and adds zest to all sorts of dishes when used as a seasoning.  It is often that ingredient that people can’t identify in a dish that they really enjoy.

I was very pleased when my friend Susan offered me some fresh horseradish.  Her neighbour had given it to her but she’d never prepared horseradish from scratch so she passed it on to me. 

This is Susan


and this is the horseradish she gave me.


There was a lot of it!

Unlike the large roots I’m accustomed to buying, this horseradish was mostly a tangle of smaller roots. 

I decided to work in batches.  Susan and I made the first batch together. 

I trimmed some of the roots from the clump and cleaned them.  After several soaks in the sink and a good scrubbing with a vegetable brush, they looked like this:


We peeled the horseradish roots, then shredded them using the fine shredding disk in my food processor.

We measured the shredded horseradish


then we fitted the food processor with its chopping blade and returned the shredded horseradish to the processor carafe.  We added 1/4 teaspoon salt and 2 Tablespoons of white vinegar for every cup of shredded horseradish and began processing it. 

We continued to add vinegar and to process the horseradish until it reached the consistency we wanted.  (We ended up using a total of about 1/4 cup of vinegar for every cup of shredded horseradish.)

In the course of processing, the horseradish broke down further, into a fine texture, and reduced in volume by about half.  It was still coarser than the horseradish you buy in the store.  If you like a very smooth paste, I would recommend using a blender instead of a food processor.

When it was done, we spooned the horseradish into sterilized jars


and capped them with sterilized lids.

Horseradish prepared in this manner will keep in the fridge for about two months.  It can be used just as it is, mixed with an equal quantity of shredded raw beet, or stirred into Dijon mustard. 

I saved some of the horseradish for replanting.  It’s very invasive so I’ll grow mine in a large container.  As long as I replant a small portion of it every time I dig it up, I’ll have a perpetual supply of horseradish for as long as I care to use it.


A word of warning:  The fumes from horseradish are very pungent.  They'll clear your sinuses and bring tears to your eyes.  A good ventilation fan helps buy you're still likely to cry while processing it.  Do persevere though.  The flavour is well worth the effort.
______________________________________
This post is linked to Hearth and Soul Blog Hop hosted by Premeditated Leftovers, The 21st Century Housewife, Zesty South Indian Kitchen, and Penniless Parenting.

 Hearth and Soul blog hop at Zesty South Indian Kitchen

Tuesday, 27 March 2012

Pesach


Passover (Pesach) begins at sunset on April 6 this year.  On this evening, Jewish families will celebrate the first of two Passover Seders, a formalized meal during which the Jews’ liberation from slavery in Egypt is remembered both in words and prayers and in the food they eat.

To understand Seder, you need to understand the Passover story.  You can find a good recounting on line at http://www.chabad.org/holidays/passover/pesach_cdo/aid/1850/jewish/History.htm.   
It’s a nuanced story and many of the nuances are reflected in Passover tradition.  

I can't pretend to have enough knowledge to recount the story and its subsequent traditions in detail.  In a nutshell, though, the Jews emigrated to Egypt where they prospered to such an extent that the Egyptians perceived them to be a threat.  They enslaved the Jews and put them to work building treasure houses.  When the Jews continued to prosper, the pharaoh ordered that all newborn Jewish males be put to death. 

Moses survived the death edict because he was born prematurely and his mother was able to hide the fact of his birth.  Moses’ mother hid him in a basket and left him floating at the edge of the Nile, where he was found by the pharaoh’s daughter.  She took him back to the palace and raised him as her son.

As a young man, Moses killed an Egyptian for beating a Jew and was forced to flee to the desert.  He married there and worked as a shepherd, caring for his father-in-law’s sheep.  While herding the sheep, Moses heard the voice of God speaking from a burning bush, instructing him to return to help his people.

 Moses and his brother Aaron returned to Egypt and began to rouse the Jewish people.  The pharaoh was greatly angered.  He met with Moses and Aaron but refused to release the Jews, instead increasing their burden of labour.

God punished the pharaoh by sending the Egyptians ten plagues.  The last plague killed all of the firstborn males in every Egyptian household.  The Jews had sacrificed lambs and spread the sacrificial blood on the lintel posts of their doors.  The lambs’ blood identified their homes so that the angel of death passed them over, sparing Jewish children from the plague.

After the tenth plague, the pharaoh gave the Jews permission to leave Egypt but he sent his armies after them.  The Jews departed so hastily that they didn’t even take time to leaven their bread.  Their only provisions for their journey were unleavened.

During Passover, Jews remember the Exodus by removing all leaven from their possession for seven days, eating matzah, and telling the story of their redemption to their children.

During the days preceding Passover, Jews methodically clean their homes, removing any trace of chametz (leavened grain products). They prepare a Passover kitchen and take pains to use dishes and utensils that have not been used to serve chametz. 

Because kosher foods prepared the rest of the year can - and often do - contain chametz, they are not necessarily kosher for Passover.   Passover foods are specially prepared and certified to be free of leavened grain. 

Having grown up in a household where holiday traditions were largely centered on socializing, I’m intrigued and impressed by a holiday tradition so deeply centered upon honouring history and spiritual beliefs.  I find the symbolism of the Passover Seder fascinating. 

If you, like me, are interested in learning more about Pesach, it’s history, it’s traditions, and the meanings behind its observances, you’ll find the websites listed below to be of interest:


Enjoy your reading. 
______________________________________
image source: http://minos-minal-omfalos.blogspot.ca/2011/04/hag-sameach-pesach.html

Thursday, 15 March 2012

My Heart in a Box


Anyone who’s been married for any length of time will tell you that it’s not about riding into the sunset and living happily every after.   Just as in any other aspect of life, within marriage happiness comes and goes.  It does so unexpectedly too:  When there are no clouds visible on the horizon, you can suddenly find yourself struggling to maintain your commitment, and to remember why you made it.  And sometimes when times are really challenging, you find that you and your spouse have drawn closer than you ever imagined you could.

I’ve been married for thirty years now.  (I know! When did I get that old? It snuck up on me!)  We’ve had our bad times, to be sure.  Right now, though, we’re dwelling in a moment of grace.  It’s surprising too, because it’s been a challenging year. 

I have never been more grateful for my husband than I have been in recent months and, although I try hard to say it and act it every day, I find myself wanting to make some extra gesture to tell him how much I appreciate him. 

We don’t have the means for dinners out or for vacations.  We don’t have money to buy gifts.  Whatever gestures I choose make have to be made with what we have on hand.

A few Christmases ago, our elder daughter sent us a small photo album she’d assembled out of card stock.  When closed, the album looks like a little gift box.  Opened, it has room for thirteen photos or journal entries.  I’ve made several of these albums since receiving her gift.  A very personal small album would be a perfect gesture of appreciation for my husband.  

I made
 Jack's album with photos that meant something to both of us and wrote notes to go with each photo, telling him about a special quality of his the photo brings to mind.  Each note shared a little piece of my heart, and all those notes are wrapped up in one small gift box.

Here’s how I made it.

To make a photo box, you’ll need:
  • Two 12-inch square sheets of card stock, plus one extra piece that is 5-7/8 inches square.  (I used one piece of cardstock with different patterns on each side and one piece that was a solid colour.  The 5-7/8 inch square was of the two sided card stock.)
  • A ruler
  • An X-acto knife
  • A glue stick
  • 1/8 inch wide double sided tape
  • Photos or writing to put in the album
  • Embellishments for the top of the box 

Begin by scoring and cutting the cardstock you’ll be using for the outside of the box.  Mark the paper at 3-3/4 inches, 7-1/2 inches, and 11-1/4 inches at both the top and bottom edge.  Score lines from top to bottom at 3-3/4 inches and 7-1/2 inches.  Cut the paper from top to bottom at 11-1/4 inches.  Turn the paper 90 degrees and repeat these steps.  You’ll end up with an 11-1/4 inch square that is scored into nine smaller squares.

Using the scored lines as guidelines, cut out a square from each corner of the 11-1/4  inch sheet.  Your cut sheet should look like this.


Save the trimmings.  You can use them for embellishments or for other projects.

Fold along the scored lines, toward the center of the square.


Set this piece aside and prepare the second sheet.
For the second sheet, mark the paper at 3-1/2 inches, 7 inches, and 10-1/2 inches.  Score and cut this sheet just as you did the first. 


Fold the finished piece towards the center of the square, just as you did the first.


Turn this piece over so that the folds are downward and the center square is the highest point. 


Gently flatten the paper and apply glue to the center square.  Attach the second sheet to the first, making sure that it’s centered.


Mount your photos in the album.

I started with the center square.  I thought to tape the photo down on three sides, making a pocket, and then to write my message on a card that would fit inside the pocket.  It worked, but the card was awkward to remove and it was a little difficult to put back again once it had been taken out.


Since the pocket idea didn’t work as well as I’d hoped, I approached the rest of the photos in a different way.  I put a single line of tape across the top edge of the back of the photos.  Then I scored a line just below the tape and carefully folded it.  When mounted, the photos could be lifted like a flap to view the notes written underneath.  This technique worked quite well.


Once the photos were all in place, I made the lid for the box.  The album we received from our daughter had a lid that was 4 inches square when finished.  I prefer a slightly smaller lid, so that the corners of the box fit more tightly together when the album is closed.

Cut a piece of cardstock that is 5-7/8 inches square.  Mark and score a line 1 inch from each edge of the square.  Fold along the scored lines and then flatten the paper again.  This will make the folds more visible.


There will be a 1-inch scored square at each corner of the paper.  Cut diagonally across these squares and then along one right angle score, to remove a triangle from each corner. 


Apply a piece of tape or some glue to each of the triangular pieces at the corners of the paper.


Fold the edges of the paper to form the edges of the lid, adhering the corner flaps inside the lid. 


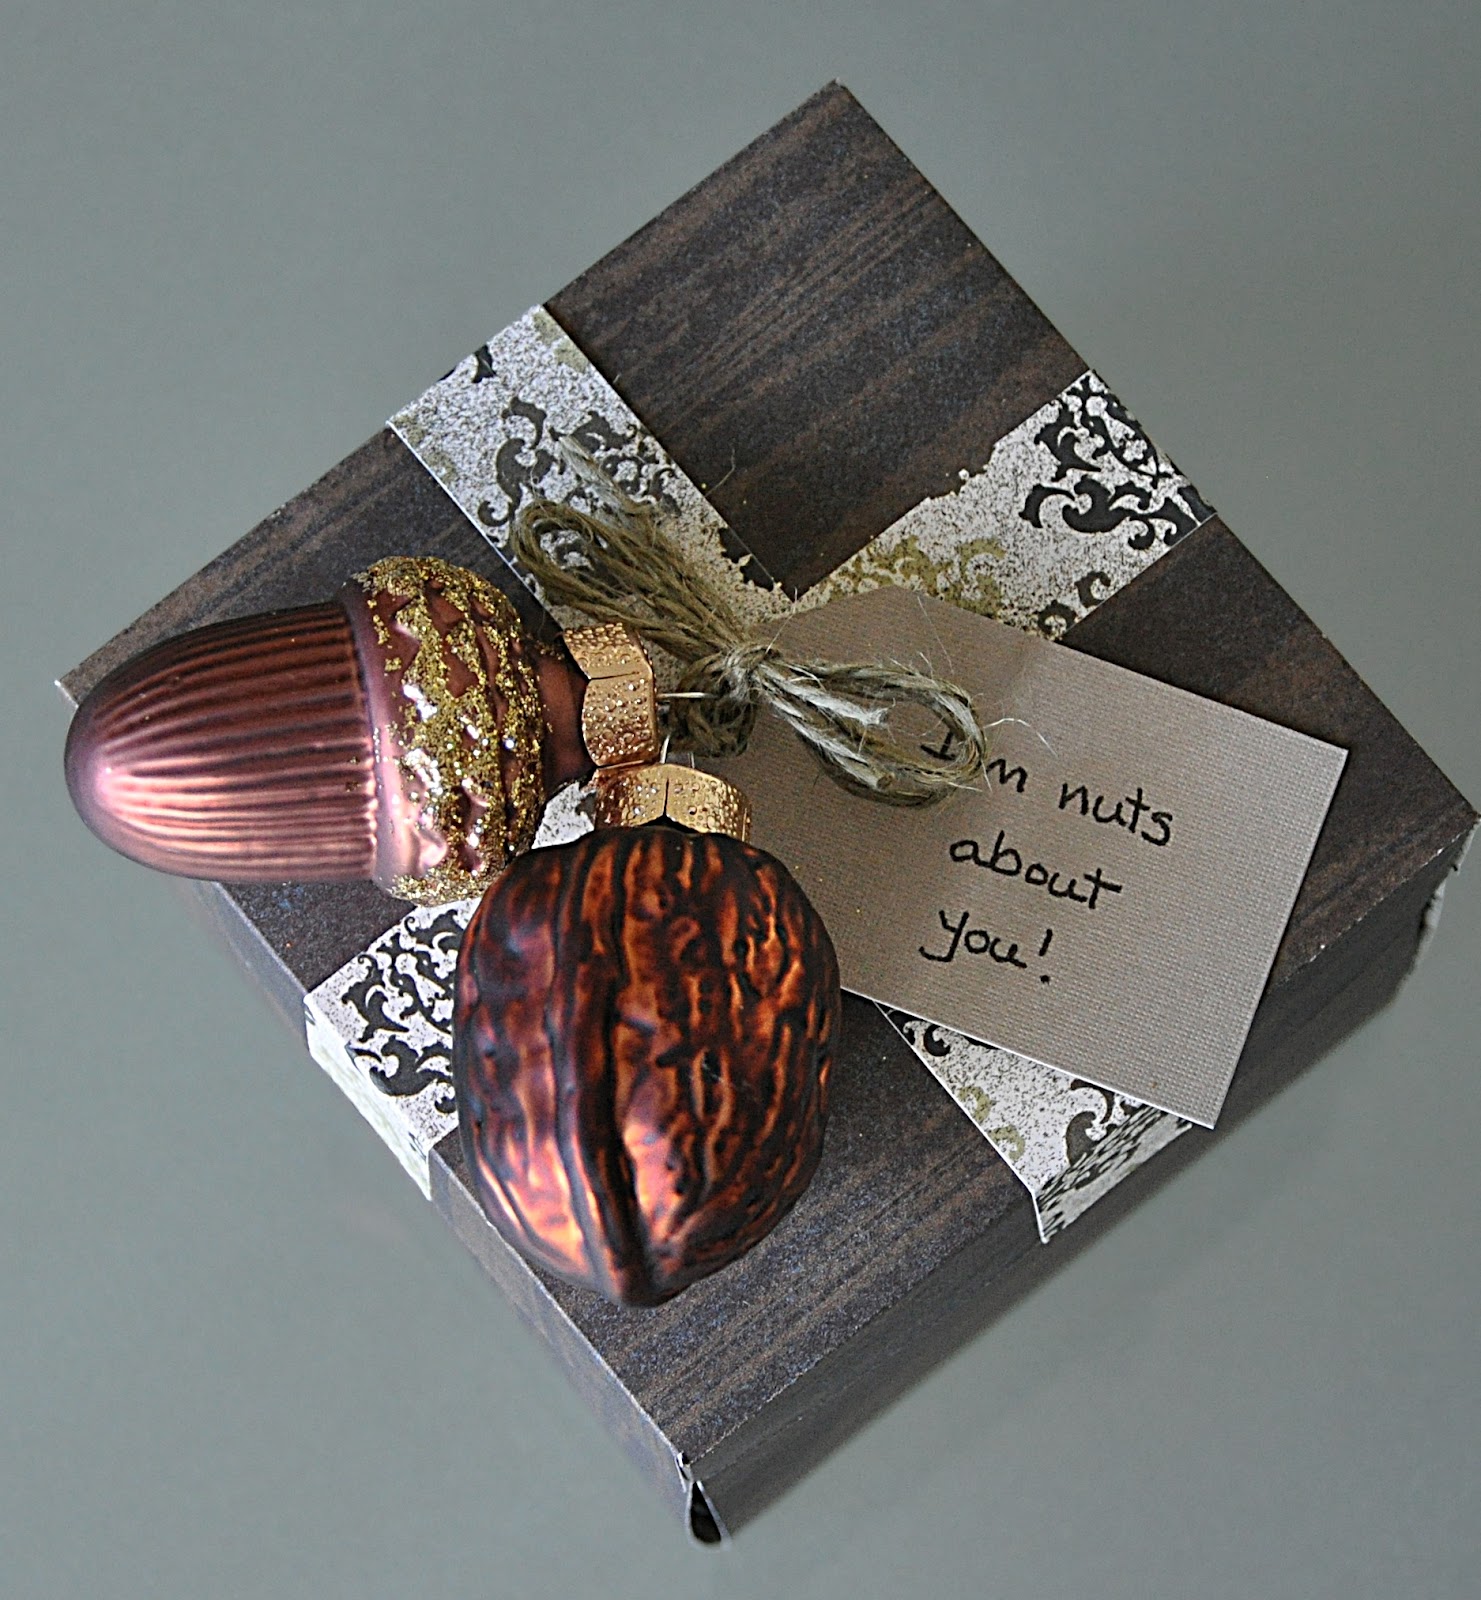
Embellish the lid if you wish to.  I used the 3/4 inch strips trimmed from the first piece of paper to make “ribbons” for the top of the box and made a tag from one of the corner squares trimmed from the second piece of paper.  I added two Christmas tree ornaments I’d purchased at a Boxing Day sale a couple of years ago, tying them and the tag onto the box with a little twine. 


I gave the box to my husband a couple of days ago.  He's gone back to it several times, re-reading the notes and looking at the pictures.  It was a good gift.  He was happy to receive it, and I was happy to make it.
_________________________________________
This post is linked to the Gallery of Favorites hosted by The 21st Century Housewife and Premeditated Leftovers, and to Think Pink Sunday hosted by Flamingo Toes, to Making Monday Marvelous hosted by C.R.A.F.T., and to Craft-O-Maniac Monday hosted by Craft-O-Maniac, to Sunday Roundup with Kayla, Heather and Rose hosted by Heatherly Loves, and to Show Me Extraordinary...Link Party hosted by The 36th Avenue.

Gallery of Favorites


The 36th AVENUE

Wednesday, 14 March 2012

Pi Day


March 14 (3.14) is National Pi Day in the U.S. 

Most of us, even the least mathematically inclined, are familiar with the concept of pi but, just as a refresher, here’s what Wikipedia has to say:

“π (sometimes written pi) is a mathematical constant that is the ratio of any Euclidean[1] circle's circumference to its diameter. π is approximately equal to 3.14. Many formulae in mathematics, science, and engineering involve π, which makes it one of the most important mathematical constants.[2] For instance, the area of a circle is equal to π times the square of the radius of the circle.
π is an irrational number, which means that its value cannot be expressed exactly as a fraction having integers in both the numerator and denominator (unlike 22/7). Consequently, its decimal representation never ends and never repeats. π is also a transcendental number, which implies, among other things, that no finite sequence of algebraic operations on integers (powers, roots, sums, etc.) can render its value; proving this fact was a significant mathematical achievement of the 19th century.
Throughout the history of mathematics, there has been much effort to determine π more accurately and to understand its nature; fascination with the number has even carried over into non-mathematical culture. Perhaps because of the simplicity of its definition, π has become more entrenched in popular culture than almost any other mathematical concept,[3] and is firm common ground between mathematicians and non-mathematicians.[4] Reports on the latest, most-precise calculation of π are common news items;[5][6][7] the record as of September 2011, if verified, stands at 5 trillion decimal digits.[8]”


There’s something fascinating about a concept so easily defined that results in a number that is an infinite, never repeating fraction.  Perhaps that's why Pi Day has such a place popular culture.  (It probably also helps that March 14 was Einstein’s birthday, but that’s a whole ‘nother blog.)

Pi Day affords a golden opportunity for educators to introduce math related activities to their students.  There’s a rich trove of on line learning resources, with suggestions for learning activities.   For those of you who are curious, I’ve listed a few links below this post. 

What’s Pi Day to me?  Well I love a good pun.  The opportunity to celebrate a math concept by baking something good to eat appeals to my sense of whimsy.  Heck, any reason to bake a pie is a good reason in my world!  The fact that it involves word play is just a bonus.

As many of you know, I plan my meals daily, based upon what we have on hand.  It’s rare for me to pre-plan a series of meals—or even a single meal—because, with just the two of us, it’s difficult to know how many leftovers we’ll have.  Not using those leftovers as ingredients in subsequent meals results in too much waste.  Pi Day is kind of an exception to my “no planning” rule though, because I have yet to see a pie of any sort go to waste around here. 

Today’s menu was actually decided long in advance, when I picked up our good food box almost a month ago.  There was broccoli in the box so I blanched some and froze it with today’s supper in mind.  In honour of Pi Day we’ll be having a broccoli and cheddar quiche for supper tonight, and applesauce pie for dessert.  Look for both recipes in coming posts.

Will you be celebrating Pi Day at your house?  Do you do any Pi Day activities with your kids?  I’d love to hear about them.

Pi Day Activity Links:
________________________________________________
image source: sciencebuzz.org