
Anyone who’s been married for any length of time will tell you that it’s not about riding into the sunset and living happily every after. Just as in any other aspect of life, within marriage happiness comes and goes. It does so unexpectedly too: When there are no clouds visible on the horizon, you can suddenly find yourself struggling to maintain your commitment, and to remember why you made it. And sometimes when times are really challenging, you find that you and your spouse have drawn closer than you ever imagined you could.
I’ve been married for thirty years now. (I know! When did I get that old? It snuck up on me!) We’ve had our bad times, to be sure. Right now, though, we’re dwelling in a moment of grace. It’s surprising too, because it’s been a challenging year.
I have never been more grateful for my husband than I have been in recent months and, although I try hard to say it and act it every day, I find myself wanting to make some extra gesture to tell him how much I appreciate him.
We don’t have the means for dinners out or for vacations. We don’t have money to buy gifts. Whatever gestures I choose make have to be made with what we have on hand.
A few Christmases ago, our elder daughter sent us a small photo album she’d assembled out of card stock. When closed, the album looks like a little gift box. Opened, it has room for thirteen photos or journal entries. I’ve made several of these albums since receiving her gift. A very personal small album would be a perfect gesture of appreciation for my husband.
I made Jack's album with photos that meant something to both of us and wrote notes to go with each photo, telling him about a special quality of his the photo brings to mind. Each note shared a little piece of my heart, and all those notes are wrapped up in one small gift box.
I made Jack's album with photos that meant something to both of us and wrote notes to go with each photo, telling him about a special quality of his the photo brings to mind. Each note shared a little piece of my heart, and all those notes are wrapped up in one small gift box.
Here’s how I made it.
To make a photo box, you’ll need:
- Two 12-inch square sheets of card stock, plus one extra piece that is 5-7/8 inches square. (I used one piece of cardstock with different patterns on each side and one piece that was a solid colour. The 5-7/8 inch square was of the two sided card stock.)
- A ruler
- An X-acto knife
- A glue stick
- 1/8 inch wide double sided tape
- Photos or writing to put in the album
- Embellishments for the top of the box
Begin by scoring and cutting the cardstock you’ll be using for the outside of the box. Mark the paper at 3-3/4 inches, 7-1/2 inches, and 11-1/4 inches at both the top and bottom edge. Score lines from top to bottom at 3-3/4 inches and 7-1/2 inches. Cut the paper from top to bottom at 11-1/4 inches. Turn the paper 90 degrees and repeat these steps. You’ll end up with an 11-1/4 inch square that is scored into nine smaller squares.
Using the scored lines as guidelines, cut out a square from each corner of the 11-1/4 inch sheet. Your cut sheet should look like this.

Save the trimmings. You can use them for embellishments or for other projects.
Fold along the scored lines, toward the center of the square.

Set this piece aside and prepare the second sheet.
For the second sheet, mark the paper at 3-1/2 inches, 7 inches, and 10-1/2 inches. Score and cut this sheet just as you did the first.

Fold the finished piece towards the center of the square, just as you did the first.

Turn this piece over so that the folds are downward and the center square is the highest point.

Gently flatten the paper and apply glue to the center square. Attach the second sheet to the first, making sure that it’s centered.

Mount your photos in the album.
I started with the center square. I thought to tape the photo down on three sides, making a pocket, and then to write my message on a card that would fit inside the pocket. It worked, but the card was awkward to remove and it was a little difficult to put back again once it had been taken out.

Since the pocket idea didn’t work as well as I’d hoped, I approached the rest of the photos in a different way. I put a single line of tape across the top edge of the back of the photos. Then I scored a line just below the tape and carefully folded it. When mounted, the photos could be lifted like a flap to view the notes written underneath. This technique worked quite well.

Once the photos were all in place, I made the lid for the box. The album we received from our daughter had a lid that was 4 inches square when finished. I prefer a slightly smaller lid, so that the corners of the box fit more tightly together when the album is closed.
Cut a piece of cardstock that is 5-7/8 inches square. Mark and score a line 1 inch from each edge of the square. Fold along the scored lines and then flatten the paper again. This will make the folds more visible.

There will be a 1-inch scored square at each corner of the paper. Cut diagonally across these squares and then along one right angle score, to remove a triangle from each corner.

Apply a piece of tape or some glue to each of the triangular pieces at the corners of the paper.

Fold the edges of the paper to form the edges of the lid, adhering the corner flaps inside the lid.

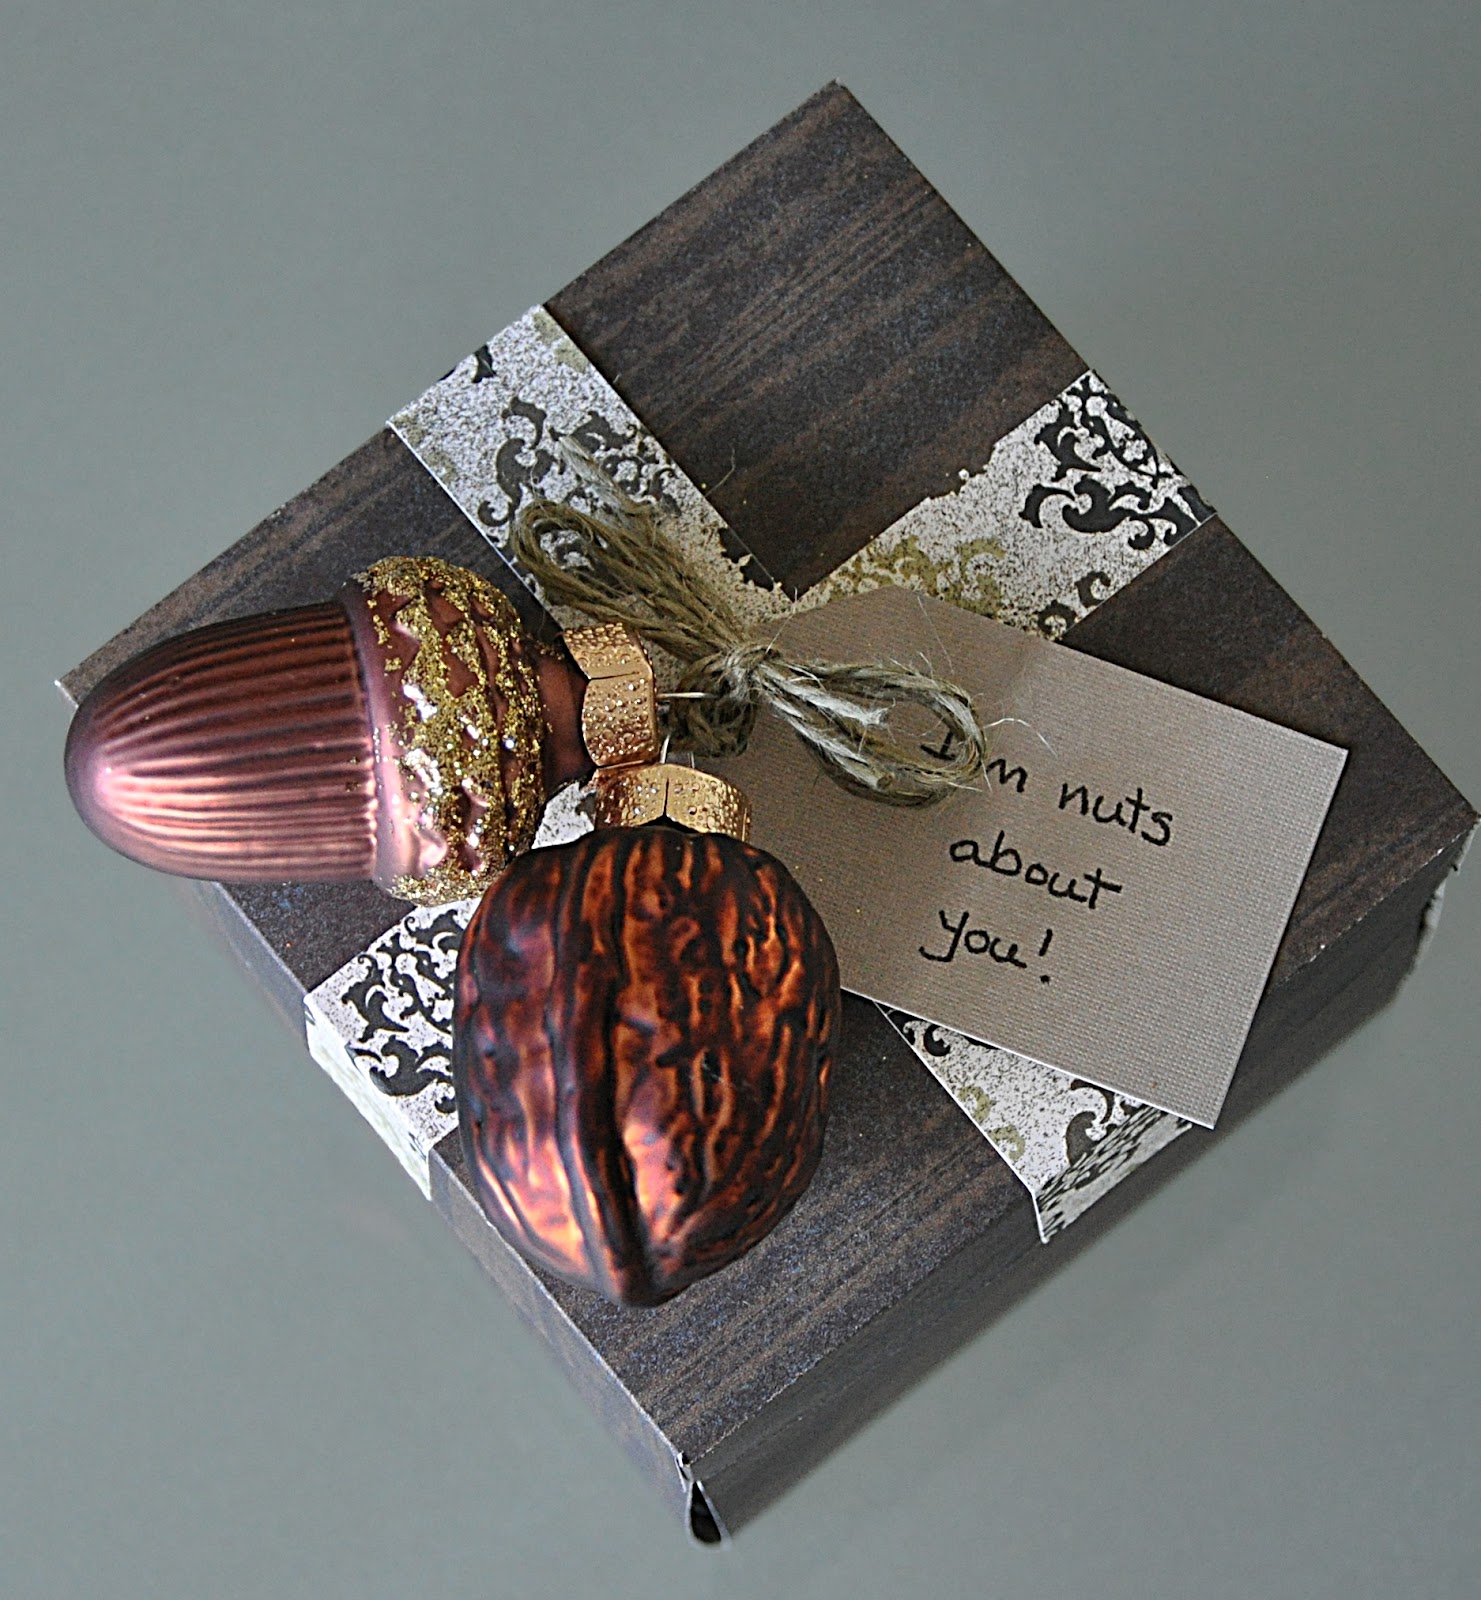
Embellish the lid if you wish to. I used the 3/4 inch strips trimmed from the first piece of paper to make “ribbons” for the top of the box and made a tag from one of the corner squares trimmed from the second piece of paper. I added two Christmas tree ornaments I’d purchased at a Boxing Day sale a couple of years ago, tying them and the tag onto the box with a little twine.
I gave the box to my husband a couple of days ago. He's gone back to it several times, re-reading the notes and looking at the pictures. It was a good gift. He was happy to receive it, and I was happy to make it.
_________________________________________
This post is linked to the Gallery of Favorites hosted by The 21st Century Housewife and Premeditated Leftovers, and to Think Pink Sunday hosted by Flamingo Toes, to Making Monday Marvelous hosted by C.R.A.F.T., and to Craft-O-Maniac Monday hosted by Craft-O-Maniac, to Sunday Roundup with Kayla, Heather and Rose hosted by Heatherly Loves, and to Show Me Extraordinary...Link Party hosted by The 36th Avenue.


14 comments:
I just love this idea. Thanks so much for posting this!
Thanks for stopping by. :)
This is such a lovely idea! And a wonderful reminder that we don't need to wait for a special occasion or spend tons of money to let our loved ones know how special they are to us.
Thanks Alea. My husband was very pleased to receive it. :)
Thanks for hosting the Gallery. I always enjoy the links I find there.
Wonderful idea and a precious gift to give to anyone! I will be pinning this. Thanks for sharing:)
Maysem @ odetoinspiration.wordpress.com
Thanks for stopping by Maysem, and for pinning my post. I'm glad you like the project.
What a neat idea! I don't have a crafty bone in my body; I need you all's help!
Thanks for visiting me at A Season for All Things. I'm your newest follower and look forward to more great ideas.
Hi, Ellen. I'm glad you like the photo album idea. Thanks for stopping by. I'm following your blog too. :)
First of all, congratulations on 30 years of marriage! What a wonderful gift to give your husband. Personal, handmade gifts are always the best kind and your album is just lovely. Thank you for sharing such a detailed tutorial as well - I'm not terribly good at crafty things, but your photos and instructions are so clear I am pretty sure I could do this :)
Thank you! :) I'm glad you found the tutorial easy to follow.
My husband was pleased to receive the album. He's still going back to it. :)
Thanks again for the opportunity to share my project. I really enjoy the Gallery of Favorites.
this is lovely! both your words and your present.
thanks so much for visiting my blog and for your lovely comment on my easter plates. got me to visit you :-). am following you now on facebook
love
jutta
I'm glad you enjoyed it Jutta. :) Thank you for stopping by and for "liking' my page on Facebook. I'm always so pleased when someone new joins the conversation. :)
lovely.. lovely.. am just short of words :)
how wonderful to make your own gift to ur husband..
and 3o yrs of marriage! that's jus' wonderful. congrats!
Thank you, and thanks for visiting. I'm glad you enjoyed this post.
Post a Comment